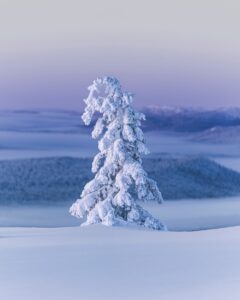
Essentials of color grading, calibration, and localized editing to transform your images

With Long-Nong Huang, in collaboration with ColorPro Talks Mini

I captured the picture below in Mount Bromo (East Java). The image features a lovely old Land Cruiser against a cloudy background with low contrast. Since it looked flat, I followed seven steps to bring the image back to life. You can find the basic steps below, while in the video, you can watch how I edited this photo and other examples in depth!  


A good composition and color palette makes photos look dynamic and aesthetic.

1) In this case, I corrected the image and cropped it to cut off the sky completely using a 4:5 ratio. In this sense, when cropping my images, I always keep in mind these two rules:

The golden ratio (1.618 to 1) is everywhere in nature and can help you lead the viewer around your image in a naturally striking and balanced way. You do not need to apply any numerical calculations to use this technique. Being aware of such a pattern, trying to find it in nature, and composing your images according to the spiral arrangement can be enough at the beginning.

The rule of thirds is a simplification of the golden ratio. It is easy to visualize as our cameras and editing software can help us to use this rule. To apply this compositional rule, place two horizontal lines on your landscape, one at 1/3 and the second at 2/3. Then place two lines vertically, again at 1/3 and 2/3. As a result, you will get a grid that divides your scene into nine rectangular areas. To use the rule of thirds, place your subject at one of the intersecting points. By doing so, the image becomes more aesthetically pleasing.

2) Next, I brightened the image up because the original was a little bit dark (exposure +0,95) and also went a bit more to the green side (tint -18).

3) To start giving the image my color style and add contrast, I used the Dehaze slider (-19), and I also took down a bit of Clarity to make it softer (-20).

4) I used the tone curve to enhance the contrast further. I created an S shape and was especially interested in darkening the shadows and the mid-tones. Since the image looked too bright for my taste, I lowered the exposure from +0,95 to +0,85.

5) Next, I took down the highlights (-6) and the whites (-27). I also took up the blacks to make the image more versatile to edit later (+52).

6) Before the color mixture, I went to the Calibration menu. I wanted the shadows to be a bit more green. So I took the bar to the left (-7). The Red Primary made the car a bit more yellowish-orange while making the background warmer (+43). The Green Primary splits the colors between the orange and the green tones. Pushing it to the right makes the green tones colder, or we can bring them closer together. In this case, I took them closer together, but not much (-16).

7) After these adjustments, the image still lacked a bit of contrast. So I worked with localized editing in the foreground, subject, and background, where most of the magic happened! Watch the last example in this video for the full breakdown! 

Discovering Beauty with ViewSonic ColorPro VP3881a

Nothing fulfills me more than exploring the breathtaking beauty of nature and capturing these moments on video. Back in my studio, the ViewSonic ColorPro VP3881a monitor, with a 38” widescreen, offers an expansive view of my timelines.

The monitors, offering bright and vibrant colors with precise color accuracy and 100% coverage of sRGB and Rec. 709 for videos, enable precise color grading, allowing me to transform my RAW footage into something that looks lively and cinematic!

THE LATEST STORIES

WRITEN WITH PASSION TO INSPIRE YOU
@liam_alford_photography_Nomadict 11

Liam Alford (@liam_alford_photography): Best of the week 33 at #nomadict 2024

Liam Alford is a self-taught nature and wedding photographer with a passion for capturing the special moments in the world through his lens. In this article, we learn about his journey, valuable lessons from his outdoor experiences, and his shooting + editing approach to the image that won the Best of the Week 33, 2024.

Alvaro Valiente - @alvarovaliente - Nomadict 10

Alvaro Valiente (@alvarovaliente): Visual creator based in the US

In this article, we delve into the inspiring journey of Alvaro, a former computer engineer who transitioned into a full-time landscape photographer and videographer. Through his reflections, Alvaro shares the challenges and triumphs of pursuing his passion, the evolution of his craft, and the deep connection he fosters with nature through his work.

Ferhat Ucar - @ferrygraphy - Best of the Week

Ferhat Ucar (@ferrygraphy): Best of the week 23 at #nomadict 2024

In this article, photographer Ferry, born and raised in Dordrecht (NL), shares his journey from an adventurous safari in Tanzania to becoming a passionate wildlife and landscape photographer. He delves into the lessons learned, the intricacies of his creative process, and the story behind the shot that won the Best of the Week 23.

Nomadict_@timbenzzz-02-Winning photo

Tim Benz (@timbenzzz): Best of the week 25 at #nomadict 2024

Tim is a passionate travel photographer dedicated to capturing nature’s beauty and inspiring others through his visually compelling images. In his story, we learn about his memorable experiences, valuable lessons, and the meticulous approach he takes to achieve his goal of becoming a successful travel photographer.

Best of the Week - After

Anthony Mazza (@vagamazz): Best of the week 19 at #nomadict 2024

Through constant self-challenge and engagement with other creators, Anthony has significantly grown as a photographer, learning valuable lessons along the way. His work aims to convey powerful stories and emotions, reflecting his commitment to raising awareness about the planet’s fragility.

@harrysohalphoto colorgrading

How to edit your travel indoor sunrise images step by step

This image is one of Harry’s most celebrated photos on social media, with over 100,000 likes. To help you understand the success of this photo, Harry has provided a step-by-step guide to the image and its color grading, including presets for you to easily follow and try!