Fredrik Strømme
@fredrik_stroemme
Photographer based in Norway
Fredrik began his creative journey by editing stock photos on Photoshop and made it to now making a living from photography. In this interview we asked him about the small steps he’s taken, the lessons he’s learned, and what he would recommend to other photographers to grow their brands.
The biggest challenge for Fredrik has been to get exposure, be noticed, and keep the motivation when the goal of making a living with photography seemed impossible to reach. Not giving up brought reward when Instagram shared one of his photos, which subsequently boosted his brand. Newspapers, radio stations, and local TV programs noticed his work as a result, and publication through by these means brought Fredrik’s first clients.
His work, which mainly has a dark, atmospheric mood, is inspired by movies and tv series. Pausing the scene helps him to pay extra attention to light and colors. Fredrik has created many editing tutorials in English and Norwegian, and in this interview, he explains his editing process and provides quite some tips as well. Besides editing, Fredrik’s style is largely achieved by shooting in rain or rainy conditions. He loves getting out just when it’s about clear up, so he doesn’t get too soaked but he still enjoys the perfect light conditions, the moody atmosphere, and still has every spot for himself. Over time he’s discovered ways to comfortably shoot under the rain or drizzle.
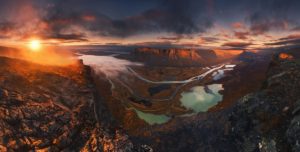
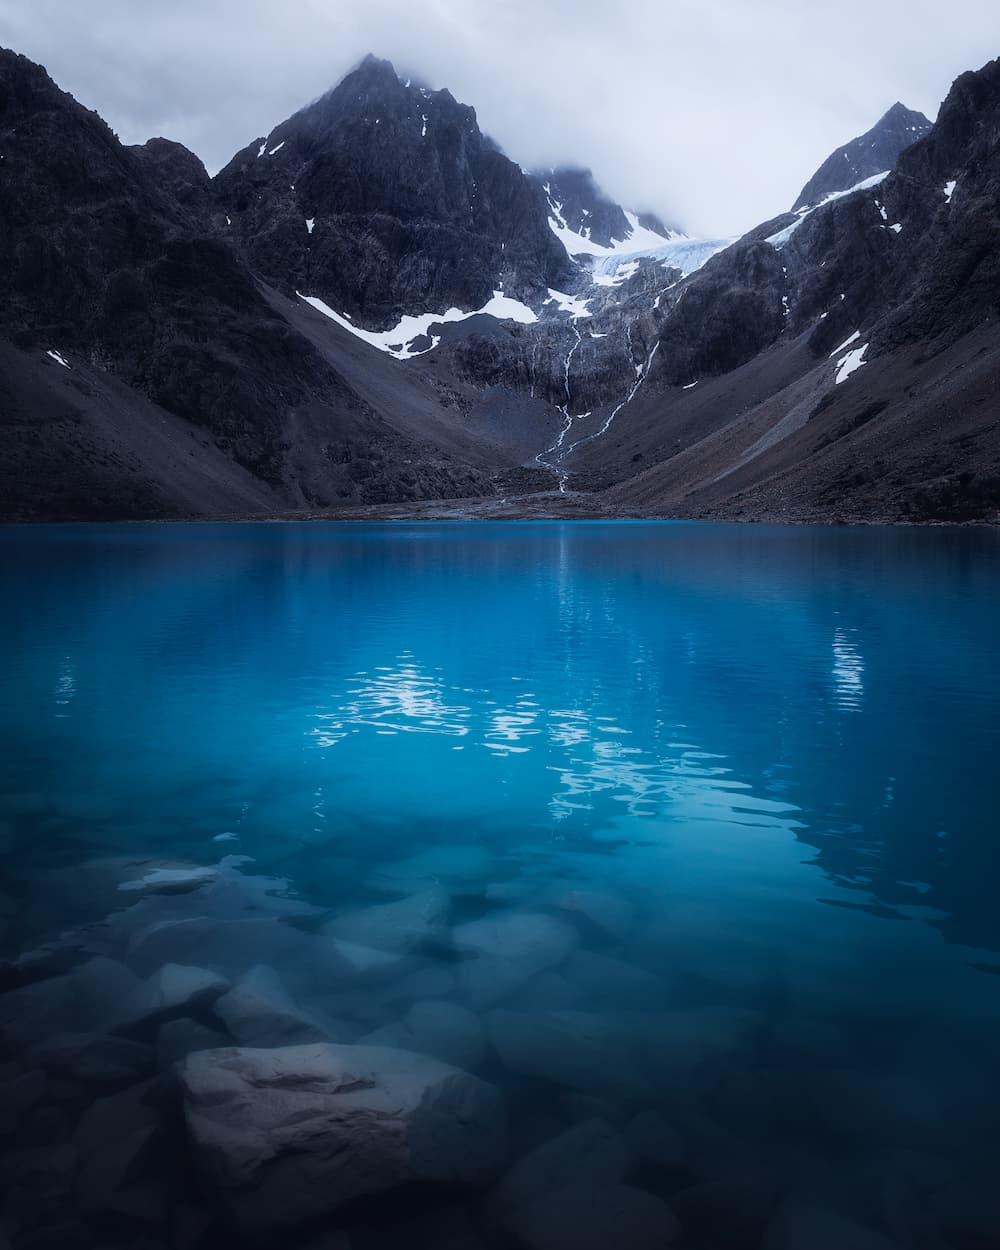
We spoke about one defining photo style-wise that represents him as an artist, and why he chose this photograph of Innerdalen, a place not far from Trondheim, his hometown. Actually, one of his recommendations to photographers pursuing (full-time) careers, is to invest more time in finding new places rather than visiting the most popular spots, since that generates more traffic and visibility than any other popular spot the audience sees for the 10th time.
If you are curious about all that Fredrik shared with us, keep reading!
Interview
Welcome Fredrik!
Your photography journey started with Photoshop. You spent years editing stock photos before getting a camera as you wanted to create your own images. How did you begin learning to shoot good photos? And what would your approach be now to start learning, after all the experience you have gathered over the years?
After I got my first DSLR, I spent a long time using full automatic on the settings, as I was a bit intimidated by all the functions on the camera. And I also thought this would be the easiest and fastest way to get good photos, but which of course didn’t give me the results I wanted. So I started investing a lot of time learning all I could about the exposure triangle which meant I could set my settings manually to get better photos.
One obvious way to learn is YouTube, where there are lots of tutorials on this, in all genres of photography. So I have spent hours and hours there but probably where I learned the most from in my early days, was using photography sites like for instance 500px. Not only did I learn a lot about compositions and angels watching photos on these kinds of websites, also often the exif info is shared. So I could see what settings had been used when they shot the photo and that was a huge help in learning to use my camera.
Today I don’t think I would have done it much differently, as this worked for me.
The one change I would have made if I was new to photography today, was immediately spending more time learning how to use the camera and how to achieve the correct settings instead of using auto mode first. For someone who has just bought their first camera, they might think it is difficult to set the settings manually. But really it is not as most cameras have evaluative metering which gives you full control, and also a much better end result than using automatic and even semi-automatic mode.
Also, I would have created a homepage much earlier; in my first years I did not have my own homepage showcasing my work. If you spend, in addition, time on good search optimization, having your own page can really boost your brand.
"Then you can also start using tools like Facebook ads, where you can target the ads to a specific audience who are potential customers for your brand."
Can you tell us something about the journey you’ve made to reach the point where you are now as a (professional) photographer? What have been some major challenges and what have been some highlights that boosted growing your brand?
My biggest challenge over the years has been getting exposure and getting noticed; there are so many good photographers out there you will have to “compete” with. And another challenge that comes with this is motivation, as earning a living with photography can often feel like an impossible mission.
"But I have learned not to give up and keep my eyes on the target, and then my chance eventually came."
Last year I was contacted by Instagram, they wanted to share one of my photos on their main account. This of course gave my brand a huge boost. Also locally in my hometown and the area around, because several newspapers, radio stations, and local tv programs found the Instagram feature interesting. Suddenly my name was out there and I got contacted by clients, not in particular just for nature photography, but for different kinds of needs I could help them with as a photographer.
You loved dark fantasy art and currently with your photography you focus on atmospheric landscape and forest photography. What are your sources of inspiration for your photography and art?
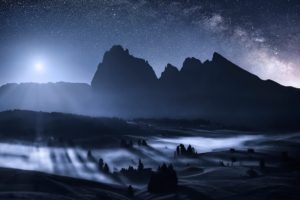
Even if my style has progressed and expanded over the years, my preferred style is still dark and moody. And it’s when I’m out in those conditions I feel most inspired, both while shooting and during the post-processing.
My main inspiration comes from movies and tv series, where I pay extra attention to colors and light. I might even pause a scene to study it closely.
It started with the movie Sin City, which is an amazing film visually speaking. Even if many of those scenes are black and white, it inspired me to see how cool the combination of toned-down colors and rain can look.
Of recent shows, the German Netflix series The Dark inspired me.
The mood is so dark and eerie, and I’ll admit after seeing that show several of my photos have got a little more cyan color and I’ve also used my fog brushes more.
You go out more often when it rains than when the sun is setting. How do you assure good photographs in the rain? What are the things you do in terms of equipment, clothing, settings, etc. that allow you to work well in the rain and obtain good results?
Shooting in rain is challenging for obvious reasons; you will get soaked. So having good clothes and shoes is key, as getting wet and cold takes some of the fun away. Also, stock up on cloth as you will need to wipe the lens often.
What I do is checking the weather forecast and heading out a little while before the rain should stop. You will get less challenging conditions when the rain decreases, but the mood will still remain for a good while. The light conditions after heavy rain are often be spectacular, which is very rewarding. A bonus doing this is that you will get the spots all for yourself, with awesome conditions, for a good period of time. I also like heading out some time after the rain has stopped, and it has started to dry up.
If you’re out in heavy rain and you really want that shot, but struggle with the lens getting wet fast, there is a trick I use which works well: I place my camera on a tripod, set the focus and settings before I wipe the lens, and just after wiping I put the lens cap on. Then I set the self-timer to 2 or 10 seconds, and just before the camera shoots, I remove the lens cap. That way I manage to take a quick shot with the correct focus and settings before the lens gets wet again. I also underexpose my shots, so I can bring back some details in the sky in the post-processing, if needed (the gray-white sky sometimes can look a little boring).
You have created tutorials on editing in Norwegian and English. What are your favorite tools and tricks to create the atmosphere you are looking for?
A key factor in my post-processing is that I use both Lightroom and Photoshop. In Lightroom, I do the RAW adjustments and in Photoshop I add extra mood. I start with basic adjustments, then add shadows and light using gradients. My favorite slider to add mood in Lightroom is the dehaze slider, which adds a hazy and more atmospheric look. Make sure to add some contrast after, otherwise, the photo will end up a bit flat.
I color grade in Lightroom as well, often using a cold tone in both the shadows and the highlights. If you are unsure of which colors suit each other when color grading, a good tool to use is the color wheel. This will show you what colors match well and which don’t.
A safe choice is to use complementary colors, like for instance blue in shadows and orange in highlights. This cold/warm combination is always a winner.
In Photoshop a very easy way to add mood, even if you’re not very familiar with Photoshop, is by using the Color Lookup adjustment layer. I often use for instance NightFromDay which adds a darker mood and color tone. Combine it with FoggyNight and HorrorBlue and you will get a very atmospheric photo within just a couple of minutes of work. Also, Color Balance is a great way to improve on the color grading already done in Lightroom.
Even if masking in Lightroom has improved a lot, you still can mask much more detail in Photoshop. So I build on the light created in Lightroom, and further in Photoshop using masks. One easy way is by using the Polygon lasso tool and making a selection where you want the light. Feather the selection to get smoother edges and bring up the light in that selection using Curves or you can use the Gradient fill adjustment layer and set it to radial. This way you can create a really atmospheric and hazy light also quite easily.
In the majority of the cases, I finish my processing using The Orton Effect, bringing some dreamy softness to the photo. Just make sure to don’t overdo the softening or it might start looking like a painting (unless that’s the effect you want of course). Mask out parts of the photo where softening looks too unnatural.
Can you share with us a photo that you feel truly represents you as an artist/a photo you are proud of and explain the story behind it? What makes that one so special? Feel free to share the before/after and editing process as well!
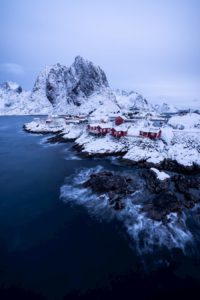
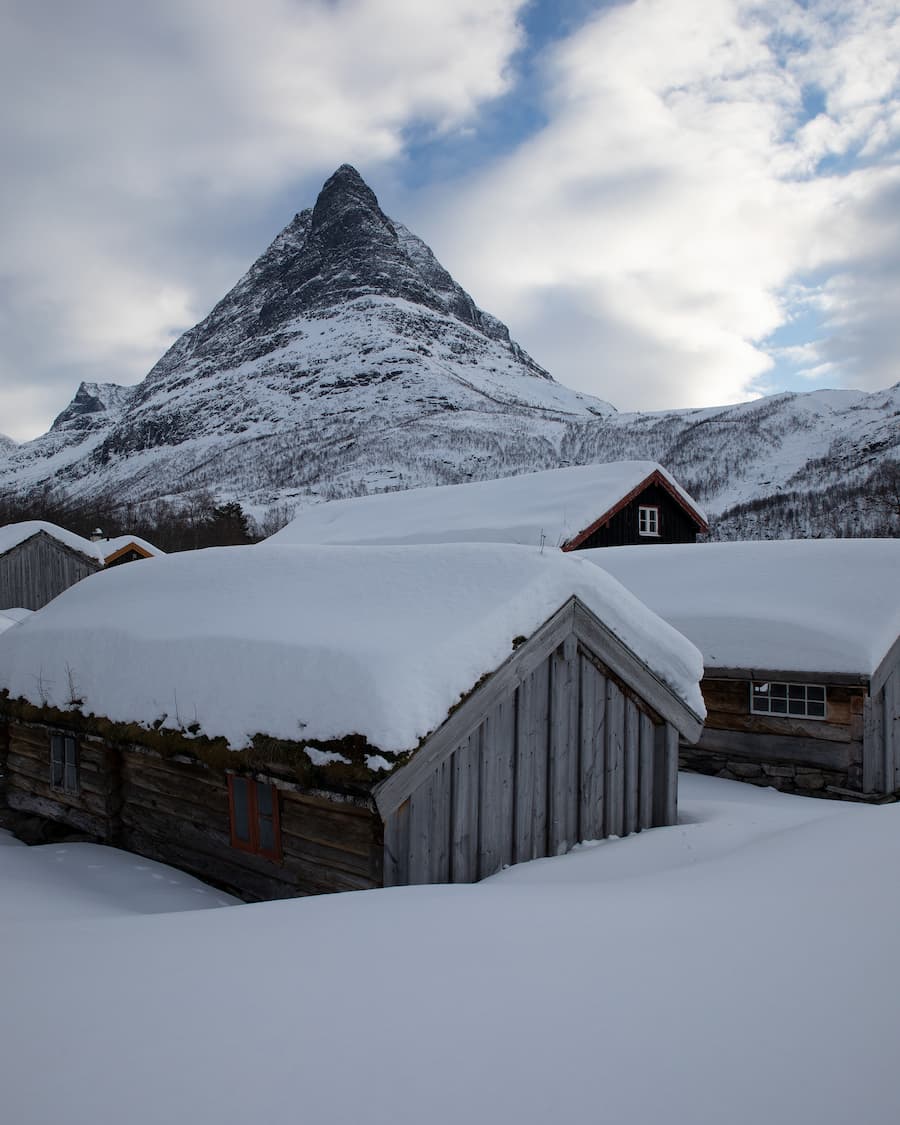
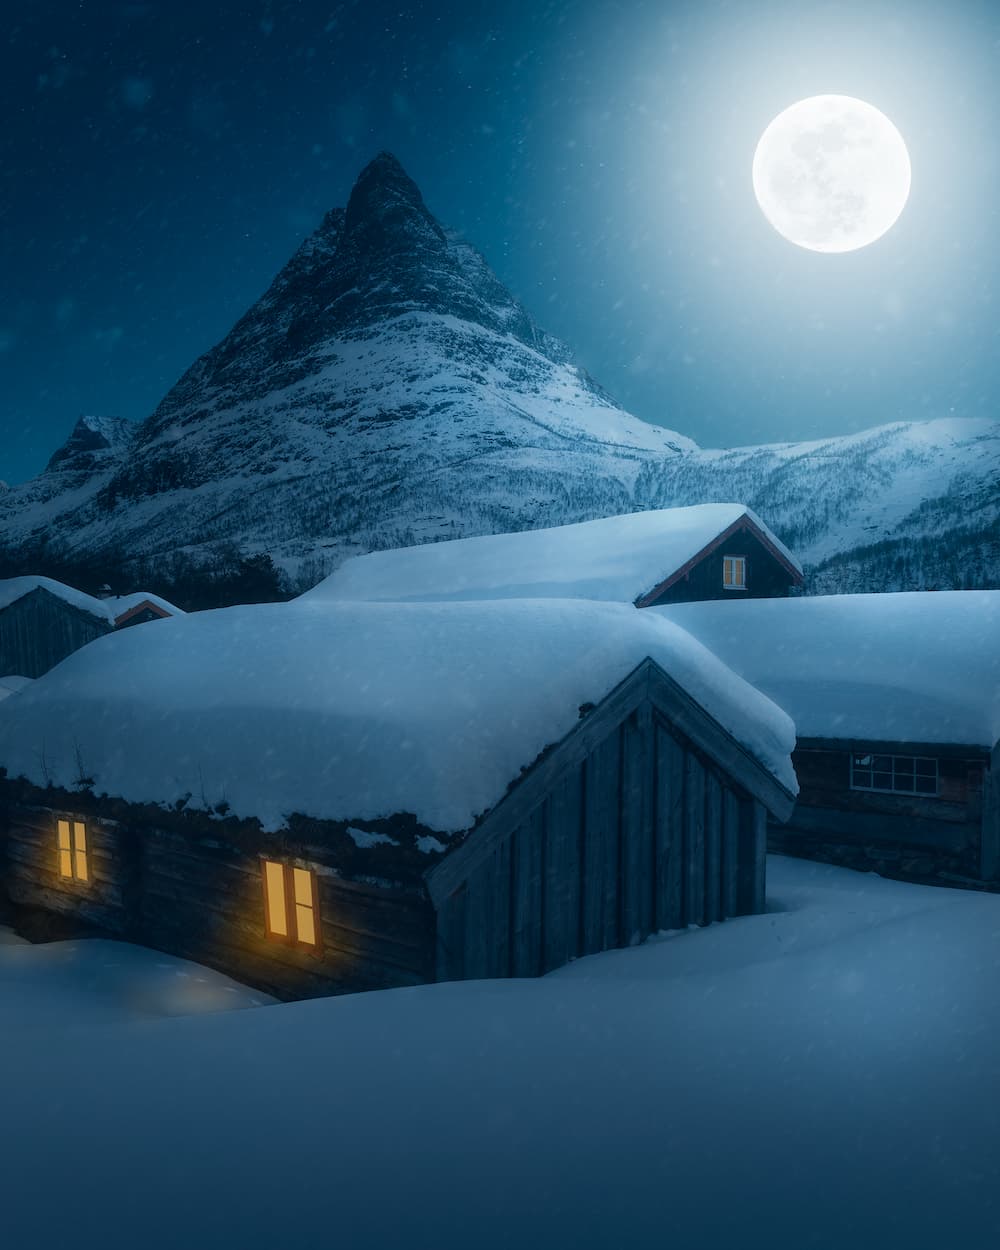
One of my favorite places to visit in Norway is a valley called Innerdalen. This is not too far from my hometown, so it is a place I try to visit once each season. It is known to be one of the most beautiful valleys in Norway. I like it there in wintertime in particular, however I have not yet had the perfect conditions, and it is too cold there to head out at night. Last time there was so much snow and the perfect winter conditions, but not a particularly good light. So I decided just to take a couple of quick photos and then create something cool out of it in post-procession when I got home. I love the editing process, and sometimes I go a bit further like on this particular piece where I wanted to create a magical winter scene. And I think it turned out really good.
I used several of the techniques explained earlier turning it into a night scene, starting with giving the RAW file a cool color tone in Lightroom. In Photoshop I added a night sky using gradients and also used a moon brush. So I inserted an oversized moon to build on the dreamy fantasy end product I was aiming for. I then spent a lot of time dodging and burning in order to make the light from the moon look natural on the mountain and the cabins.
This was done on several overlay layers in Photoshop.
Also, I added a warm light to the windows using brushes and glow. These windows complement the cold color tone of the rest of the image, and I want people who see the image to dream of sitting inside the warm cabin looking out to the cold magical winter mood.
I also wanted it to be snowing, yet on a starry night. So I used my creative freedom, making it snow from a clear sky and I got surprisingly few comments on that particular detail.
You live in Trondheim, Norway. What can you tell about your local environment in terms of photogenic spots and cultural curiosities that might be interesting for fellow photographers to know?
My hometown Trondheim does not have wild nature, yet it is a quite picturesque city. The most popular motives are the historical wharves, used for boat houses in old times. Here you can get some really beautiful photos, especially during sunrise or sunset. And if the water is still, you’ll get reflections.
If you’re into street photography an area called Bakklandet is a must to visit. Here you will find old and charming houses in many different colors. We also have a beautiful church called the Nidaros Cathedral, a popular photograph/scene. There is a fjord too, called Trondheimsfjorden. Strolling along there you will get lots of beautiful photos. And there are also a couple of places along there you can stop for food and drinks.
My favorite area for photography though are the hiking trails in an area called Bymarka. Here you will find almost infinite trails through forests and past creeks, and is really a dream if you like to enjoy the calmness of forest photography. Be there early in the morning and you might see foxes, deers and a lot of birdlife.
What has been one of your most remarkable experiences so far? What made it so special?
Being a nature photographer, I have had so many amazing experiences. Yet those I remember most, are those places I have spent hours upon hours finding them on Google Earth, then traveling to the places and finally experiencing them with my own eyes.
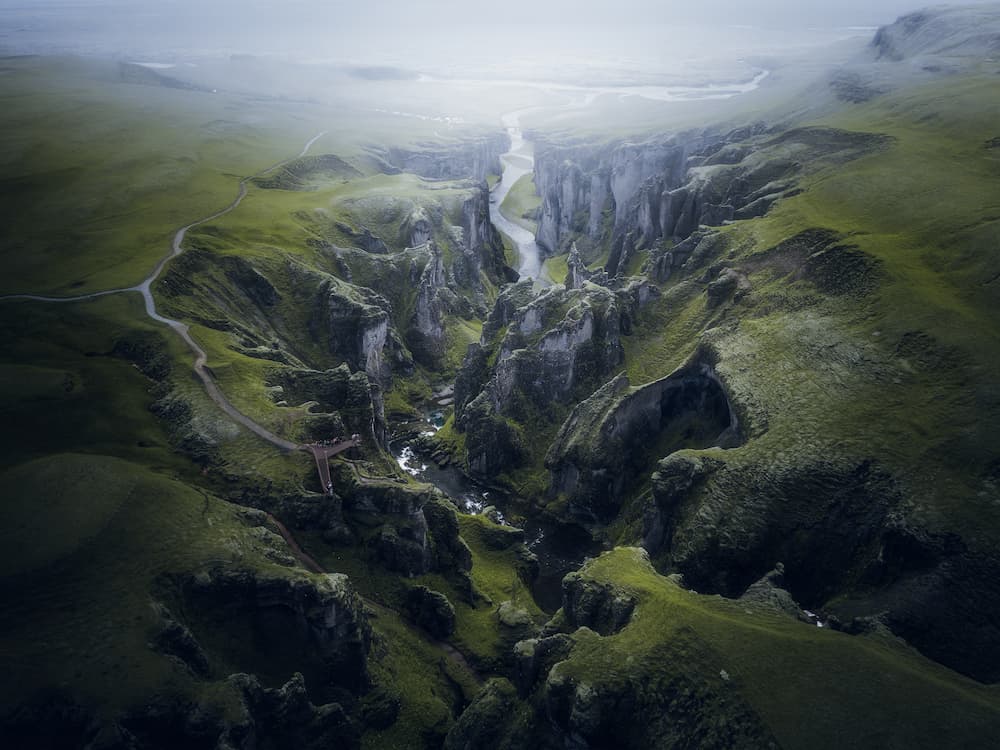
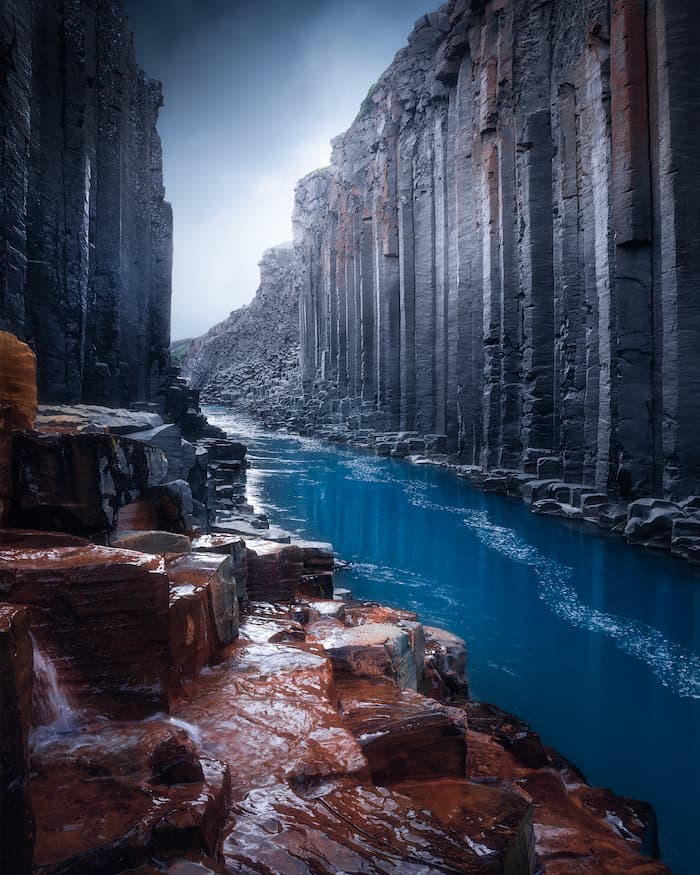
In particular, I remember visiting a canyon called Mulagjufur on Iceland for the first time. This is a quite well-known place now, but some years ago not many photographers seemed to know about it. I had no idea exactly where the location was, as I had only seen one single photo from it but from that photo, I got a hunch on which part of Iceland it could be. I can’t express the joy I felt when I finally found the exact location on Google Earth. When we got to the start of the hike, there was of course no one else around. And the tension was building up throughout the hike. Finally on top seeing this giant canyon ending up in a over 100 meters tall waterfall was such a unique experience and something I wish I could relive for the first time. We spent almost the whole day here, all by ourselves, contemplating some of the most spectacular nature I have ever seen.
Nowadays we see so many young talented artists pursuing a career as (full-time) travel/landscape photographers. What four pieces of advice would you give them?
If I should give some advice to photographers pursuing their dream of making a living as landscape photographers, the most important is to be patient and to not give up.
It is a lot of work and doesn’t happen overnight. But if you stay consistent and focused on your target, your chance will come.
Also, make sure people know you exist and let them know that you’re good at what you do. Don’t be afraid to send out emails showcasing your work to potential customers. You will get a lot of no’s, but eventually, you will get a yes and then the ball can start rolling.
Try not to only visit and showcase the most popular places, but spend time finding unique places not so many have heard of. Those will give you more buzz than from spots people have seen lots of times before.
- And finally, start a blog on your photography homepage. Google algorithms love sites that are regularly updated with fresh material, and that can boost your ranking to a point where clients will start contacting you.
Besides the obvious skills and things to practice related to the craft, what do you think is a small secret to becoming a better photographer and creating success as a photographer?
I think it is important to find your own, unique style, separating you from the rest. Especially when it comes to post-processing. I see so many photographers who have copied each other’s style that their photos practically look the same. All that is needed is just do some tweaks nobody else does and people will immediately recognize it’s your photo when it shows up in their feed. This way your name and brand will be noticed more quickly.
Would you like content like this sent to your inbox?